SStarLib's Blog

  • Home

  • About

  • Tags

  • Categories

  • Archives

  • Schedule

  • Sitemap

BFS DFS 判断DAG(有向无环图)

Posted on 2020-03-26 Edited on 2020-03-27

BFS DFS 判断DAG(有向无环图)

前几天美团笔试 ,笔试里有一个单源最短路问题(直接弃了,完全没想到会考图论的问题,Dijkstra算法也完全想不起来),最近看了下leetcode上一道图论的问题,AOV的拓扑排序问题。

[TOC]

一、DAG 和 Topological sorting

以下基本都是一些本科数据结构的知识,不过因为本科听课不太认真,几乎都是现查现学的。

DAG

DAG(Directed acyclic graph)即有向无环图,维基上的介绍: Directed acyclic graph

简单的介绍DAG,是一个图且是一个有向图,而且整个图没有回路,不会构成环。据说目前比较热门的区块链技术好像也有应用这种数据结构,文章: 解释有向无环图(达格),真正的区块链3.0。

DAG 具有 拓扑顺序(Topological ordering)关于拓扑顺序,引用维基上的一段话:

Every directed acyclic graph has a topological ordering, an ordering of the vertices such that the starting endpoint of every edge occurs earlier in the ordering than the ending endpoint of the edge. The existence of such an ordering can be used to characterize DAGs: a directed graph is a DAG if and only if it has a topological ordering. In general, this ordering is not unique; a DAG has a unique topological ordering if and only if it has a directed path containing all the vertices, in which case the ordering is the same as the order in which the vertices appear in the path.[[9]

The family of topological orderings of a DAG is the same as the family of linear extensions of the reachability relation for the DAG,[10] so any two graphs representing the same partial order have the same set of topological orders.

大概意思就是 Graph中顶点之间有顺序上的约束关系,这种约束关系用边表示。即:如果图中从V到W有一条有向路径,则V一定排在W之前。满足此条件的顶点序列称为一个拓扑序。(维基里涉及到族的概念,由于不是科班的,也没有学过拓扑学,搞不懂)

Topological sorting

维基的解释:

Topological sorting is the algorithmic problem of finding a topological ordering of a given DAG. It can be solved in linear time.[16] Kahn’s algorithm for topological sorting builds the vertex ordering directly. It maintains a list of vertices that have no incoming edges from other vertices that have not already been included in the partially constructed topological ordering; initially this list consists of the vertices with no incoming edges at all. Then, it repeatedly adds one vertex from this list to the end of the partially constructed topological ordering, and checks whether its neighbors should be added to the list. The algorithm terminates when all vertices have been processed in this way.[17] Alternatively, a topological ordering may be constructed by reversing a postorder numbering of a depth-first search graph traversal.[16]

简单而言,拓扑排序:获得一个拓扑序的过程就是拓扑排序

AOV

AOV (Activity On Vertex) 网络:把活动作为顶点(Vertex),时间的约束关系作为边(Edge),一个AOV网络一定是一个DAG。浙大陈越老师的数据结构里的一个例子:

image-20200326193703485

二、判断DAG

判断一个图是否为一个DAG,即合法的AOV网络。主要有两种方法,基于BFS(广度优先搜索)的拓扑排序,和DFS(深度优先搜索)

python构建图

图有两种实现方式,一种是邻接矩阵,一种是邻接表,由于邻接矩阵不太适合稀疏图的情况,故选用邻接表。邻接表不一定非要使用链表的数据结构,这里二维数组即可,例如v指向w1, w2,…,wn,则graph[v]=[w1, w2, …, wn];

关于python建图,推荐这篇文章Graphs in Python

BFS

基于BFS的拓扑排序,通过不断的遍历入度为0的顶点实现,遍历方式是广度优先搜索,每次遍历入度为0的顶点,同时每遍历过一个顶点,就将其指向顶点的入度减一, 如果我们能够遍历图的所有顶点,则表示这是个DAG,如果未能遍历玩所有顶点,则表示图有环。

算法框架是陈越老师的ppt里的:

image-20200326194155423

Python3实现:

1
2
3
4
5
6
7
8
9
10
11
12
13
14
15
16
17
18
19
20
21
22
class Solution:
def canFinish(self, numCourses: int, prerequisites: List[List[int]]) -> bool:
# create graph
graph = [[] for _ in range(numCourses)]
indegree = [0]*numCourses
for end, start in prerequisites:
graph[start].append(end)
indegree[end]+=1
# topological sorting
queue = []
cnt = 0
for i in range(numCourses):
if indegree[i] == 0:
queue.append(i)
while queue:
v = queue.pop(0)
cnt += 1
for w in graph[v]:
indegree[w] -= 1
if indegree[w] == 0:
queue.append(w)
return (cnt==numCourses)

DFS

DFS算法:在深度优先搜索时,如果正在搜索某一顶点(还未退出该顶点的递归深度搜索),又回到了该顶点,即证明图有环。(图片来自小象学院ppt)

image-20200326195653054

算法思路:

image-20200326195757463

Python3实现代码:

1
2
3
4
5
6
7
8
9
10
11
12
13
14
15
16
17
18
19
20
21
22
23
24
class Solution:
def canFinish(self, numCourses: int, prerequisites: List[List[int]]) -> bool:
# create graph
graph = [[] for _ in range(numCourses)]
visited = [-1]*numCourses
# Adjacency list
for x,y in prerequisites:
graph[y].append(x)
# dfs
def dfs(start, graph, visited):
visited[start]=0
for w in graph[start]:
if visited[w]==-1:
if not dfs(w, graph, visited):
return False
elif visited[w]==0:
return False
visited[start]=1
return True
for x, y in prerequisites:
if visited[y]==-1:
if not dfs(y, graph, visited):
return False
return True

BFS和DFS对比

时间复杂度上区别不是很大,空间上DFS略大。

三、总结

图论的问题面试时考的不多,且比较套路,基本都是BFS,DFS,最短路、最小生成树、拓扑排序之类的,python建图也不是太难。

推荐公众号文章:从拓扑排序到 Carthage 依赖校验算法

同时这道题在2018年阿里校招时真的出现了,上面公众号大神做的一个线上oj: DissCode

Tree and Divide Conquer

Posted on 2020-03-24

Tree and Divide Conquer

最近做二叉树相关的题,被递归搞的晕头转向。

[TOC]

一、树的性质

参考:Tree总结

由于树的结构,这种数据结构很适合用分治(Divide Conquer)

Divide and Conquer模版

递归算法模版;

1
2
3
4
5
6
7
8
9
10
11
12
def traversal(root):
# base case(none or leaf)
if not root:
# do sth

# divide
left = traversal(root.left)
right = traversal(root.right)

# Conquer
res = # merge
return res

114 Flatten Binary Tree to Linked List

以 leetcode #114题为例

1)从最简单的case开始

simplest case,树只有一个元素1,直接返回;

1
2
3
4
5
6
7
8
9
10
11
12
13
14
15
16
17
18
19
20
21
22
23
24
# simplest case:
1
# 两个元素:
1
/
2
########
1
\
2
# 三个元素:
1
/ \
2 3
# N 个元素
1
/ \
LTree RTree
例子:
1
/ \
2 5
/ \ \
3 4 6

当有两个元素时:

1
2
3
4
5
6
def flatten2(root):
left = root.left
right = root.right
if left:
root.right = left
root.left = None

当有三个元素时:

1
2
3
4
5
6
7
8
9
10
def flatten3(root):
# divide
left = root.left
right = root.right
# merge
if left:
root.right = left
root.left = None
if right:
left.right = right

2)一般case

可以将其分为 左子树和右子树,(假设左右都为三个元素(base case),我们可以用上面的程序处理好)。假设左右子树都已经处理完毕。

1
2
3
4
5
6
7
8
9
10
11
12
13
14
15
16
17
18
19
def flatten(root):
# base case(none)
if not root:
return
# leaf node
if not root.left and not root.right:
return root
# divide
left = root.left
right = root.right
# conquer 处理左右子树
flatten(left)
flatten(right)
# merge
if left:
root.right=left
root.left = None
if right:
...

3) merge

如何把子问题的解merge原问题的解?

把子问题的解 merge成问题的解时需要解决一个问题,即如何将右子树链接到左子树的后面?

  1. 左子树的哪个节点去链接右子树根节点?
  2. 如何确定这个节点的位置

根据题意知道,最终生成 linked list 顺序是先序遍历的顺序,故将左子树最右边的叶子节点链接到右子树的根节点;使用python中的全局变量指向当前根节点下的最右叶子节点。

算法:

1
2
3
4
5
6
7
8
9
10
11
12
13
14
15
16
17
18
prev = None
def func(root):
if root is leaf:
# prev 指向左子树的最右子节点
prev=root
left = root.left
right = root.right
# 递归处理左子树
func(left)
# 如果左子树存在
if left:
# 将root的右子节点指向左子树
root.right = left
root.left = None
# 将左子树最右边的叶子节点指向右子树
prev.right = right
# 递归处理右子树
func(right)

最终AC的代码:

Python3代码:

1
2
3
4
5
6
7
8
9
10
11
12
13
14
15
16
17
18
19
20
21
22
23
24
25
26
27
28
29
30
# Definition for a binary tree node.
# class TreeNode:
# def __init__(self, x):
# self.val = x
# self.left = None
# self.right = None
class Solution:
def __init__(self):
self.prev = None
def flatten(self, root: TreeNode) -> None:
"""
Do not return anything, modify root in-place instead.
"""
# base case
if not root:
return
if not root.left and not root.right:
self.prev=root
return
# divide
left = root.left
right = root.right
# conquer
self.flatten(left)
# merge
if left:
root.right, root.left = left, None
self.prev.right = right
# conquer
self.flatten(right)

代码精简版:

1
2
3
4
5
6
7
8
9
10
11
12
13
14
15
16
17
18
19
20
21
# Definition for a binary tree node.
# class TreeNode:
# def __init__(self, x):
# self.val = x
# self.left = None
# self.right = None
class Solution:
def __init__(self):
self.prev = None
def flatten(self, root: TreeNode) -> None:
"""
Do not return anything, modify root in-place instead.
"""
if not root:
return
self.prev = root
right = root.right
self.flatten(root.left)
root.right, root.left=root.left, None
self.prev.right = right
self.flatten(right)

从以上代码可以看出,其实就是对 Tree 进行先序遍历,同时将全局变量用作指针

这道题还有其他思路,(修改版的后序遍历)遍历顺序是右子树->左子树->根节点。

1
2
3
4
5
6
7
8
9
10
11
12
13
14
15
16
17
18
19
20
21
22
# Definition for a binary tree node.
# class TreeNode:
# def __init__(self, x):
# self.val = x
# self.left = None
# self.right = None

class Solution:
def __init__(self):
self.prev = None
def flatten(self, root: TreeNode) -> None:
"""
Do not return anything, modify root in-place instead.
"""
if not root:
return None
self.flatten(root.right)
self.flatten(root.left)

root.right = self.prev
root.left = None
self.prev = root

总结

  1. 对树进行divide conquer ,要把所有的最简单case列出来分析
  2. 将树分为子问题一般比较容易,关键如何将子问题的解merge成原问题的解!
  3. python的全局变量的使用。

Pytorch 孪生lstm 句子相似性

Posted on 2020-03-22

Pytorch 孪生lstm 句子相似性

复现论文 《Siamese Recurrent Architectures for Learning Sentence Similarity》

挖个坑,最近上午把这篇论文复现了,实现中文的句子相似性判断。

N 皇后问题的演进(附代码)

Posted on 2020-03-18

N-皇后问题的演进(附代码)

[TOC]

一、该类问题的通用回溯解法

N 皇后问题的解法是典型的回溯算法,回溯算法本质上就是穷举决策树。暴力有效。

回溯问题的解法框架:

1
2
3
4
5
6
7
8
9
res = []
def backtrack(path, choices):
if 满足终止条件:
res.append(path[:])
return
for choice in choices:
做选择
backtrack(path, choices)
撤销选择

关于这类回溯问题如何解,推荐这篇文章回溯算法解题套路框架

二、N 皇后问题两个核心问题

N 皇后问题 有两个需要关键处理的:

  1. 回溯,可以直接套模版
  2. 合法的放置皇后,判断位置的是否合法

如何判断位置是否合法

该部分主要参考 力扣上的这篇帖子:Accepted 4ms c++ solution use backtracking and bitmask, easy understand.

如何算合法放置?

image-20200318120331036

N个皇后,要求放置时不同行,不同列,不同对角线,如果算法是遍历每行(当然也可以遍历每列,并确保每行只有一个皇后,那么只需考虑,不同列,和不同对角线)

关于对角线部分,其实只需考虑 45度方向(即左上方)135度方向(即右上方),因为递归遍历每行时,当到达某行时,未遍历的行数皆没有放置皇后。

故可以得出代码(直接放原博主的C++代码):

1
2
3
4
5
6
7
8
9
10
11
12
13
14
15
16
17
18
19
20
21
22
23
24
25
26
27
28
29
30
31
32
33
34
35
36
37
class Solution {
public:
std::vector<std::vector<std::string> > solveNQueens(int n) {
std::vector<std::vector<std::string> > res;
std::vector<std::string> nQueens(n, std::string(n, '.'));
solveNQueens(res, nQueens, 0, n);
return res;
}
private:
void solveNQueens(std::vector<std::vector<std::string> > &res, std::vector<std::string> &nQueens, int row, int &n) {
if (row == n) {
res.push_back(nQueens);
return;
}
for (int col = 0; col != n; ++col)
if (isValid(nQueens, row, col, n)) {
nQueens[row][col] = 'Q';
solveNQueens(res, nQueens, row + 1, n);
nQueens[row][col] = '.';
}
}
bool isValid(std::vector<std::string> &nQueens, int row, int col, int &n) {
//check if the column had a queen before.
for (int i = 0; i != row; ++i)
if (nQueens[i][col] == 'Q')
return false;
//check if the 45° diagonal had a queen before.
for (int i = row - 1, j = col - 1; i >= 0 && j >= 0; --i, --j)
if (nQueens[i][j] == 'Q')
return false;
//check if the 135° diagonal had a queen before.
for (int i = row - 1, j = col + 1; i >= 0 && j < n; --i, ++j)
if (nQueens[i][j] == 'Q')
return false;
return true;
}
};

这样在判断皇后位置是否合法时,其实有很多冗余计算,不妨以空间换时间,通过数组存下位置的状态(是否可以放置皇后),原博主天才的想法:

对于 n皇后,总共有n列,45° 对角线数目:2*n-1, 对角线135°的数目也为2 * n-1。当到达[row,col]时,列号为col,则 45°对角线编号为row + col,而135°对角线编号为n-1 + col- row。 我们可以使用三个数组来指示列或对角线之前是否有王后,如果没有,我们可以将王后放在这个位置并继续。

示意图:

image-20200318121504700

代码实现(原博主的C++代码):

1
2
3
4
5
6
7
8
9
10
11
12
13
14
15
16
17
18
19
20
21
22
23
24
25
26
27
28
29
30
31
32
33
34
/**    | | |                / / /             \ \ \
* O O O O O O O O O
* | | | / / / / \ \ \ \
* O O O O O O O O O
* | | | / / / / \ \ \ \
* O O O O O O O O O
* | | | / / / \ \ \
* 3 columns 5 45° diagonals 5 135° diagonals (when n is 3)
*/
class Solution {
public:
std::vector<std::vector<std::string> > solveNQueens(int n) {
std::vector<std::vector<std::string> > res;
std::vector<std::string> nQueens(n, std::string(n, '.'));
std::vector<int> flag_col(n, 1), flag_45(2 * n - 1, 1), flag_135(2 * n - 1, 1);
solveNQueens(res, nQueens, flag_col, flag_45, flag_135, 0, n);
return res;
}
private:
void solveNQueens(std::vector<std::vector<std::string> > &res, std::vector<std::string> &nQueens, std::vector<int> &flag_col, std::vector<int> &flag_45, std::vector<int> &flag_135, int row, int &n) {
if (row == n) {
res.push_back(nQueens);
return;
}
for (int col = 0; col != n; ++col)
if (flag_col[col] && flag_45[row + col] && flag_135[n - 1 + col - row]) {
flag_col[col] = flag_45[row + col] = flag_135[n - 1 + col - row] = 0;
nQueens[row][col] = 'Q';
solveNQueens(res, nQueens, flag_col, flag_45, flag_135, row + 1, n);
nQueens[row][col] = '.';
flag_col[col] = flag_45[row + col] = flag_135[n - 1 + col - row] = 1;
}
}
};

其实完全没有必要开辟三个数组,一个flag数组就够。现在,当到达[row,col]时,列的下标为col,对角线45°的下标为n + row + col,对角线135°的下标为n + 2 * n-1 + n-1 + col -行。flag 数组的大小为 n+2n-1+2n-1=5n-2

代码实现(python3):

1
2
3
4
5
6
7
8
9
10
11
12
13
14
15
16
17
18
class Solution:
def solveNQueens(self, n: int) -> List[List[str]]:
def solveNQ(n, row, res, flag):
if row==n:
res.append([str for str in nq])
return
for col in range(n):
if flag[col] and flag[n+row+col] and flag[4*n-2+col-row]:
flag[col]=flag[n+row+col]=flag[4*n-2+col-row]=0
nq[row] = nq[row][:col]+'Q'+nq[row][col+1:]
solveNQ(n, row+1, res, flag)
flag[col]=flag[n+row+col]=flag[4*n-2+col-row]=1
nq[row] = nq[row][:col]+'.'+nq[row][col+1:]
nq = ['.'*n for _ in range(n)]
res =[]
flag = [1 for _ in range(5*n-2)]
solveNQ(n, 0, res, flag)
return res

但是python中修改字符串其实挺浪费时间的,完全可以存一个列号,等求出所有的排列后,再构造出棋盘分布。

代码如下:

1
2
3
4
5
6
7
8
9
10
11
12
13
14
15
16
17
18
19
20
21
22
class Solution:
def solveNQueens(self, n: int) -> List[List[str]]:
def solveNQ(n, row, res, flag, nqCol):
if row==n:
res.append(nqCol[:])
return
for col in range(n):
if flag[col] and flag[n+row+col] and flag[4*n-2+col-row]:
flag[col]=flag[n+row+col]=flag[4*n-2+col-row]=0
nqCol[row] = col
solveNQ(n, row+1, res, flag, nqCol)
flag[col]=flag[n+row+col]=flag[4*n-2+col-row]=1
nqCol[row] = -1
res =[]
flag = [1 for _ in range(5*n-2)]
solveNQ(n, 0, res, flag, [-1 for _ in range(n)])
for i, npCol in enumerate(res):
board =[]
for col in npCol:
board.append('.'*col+'Q'+'.'*(n-1-col))
res[i] = board
return res

17-21行代码是构造棋盘分布的

总结

  1. 回溯问题要学会套模板,
  2. python 代码最好尽可能解耦合,模块化,降低模块的耦合性。

java网络编程-Netty

Posted on 2020-03-14

Java网络编程-Netty

[TOC]

“早熟的人通常都晚熟,骄傲的人又很急性” ——《士兵突击》

理性的人最容易陷入感性的麻烦。该来的早晚要来,逃避只是把该难受的时间延后。随着真相揭开,时间发酵,然后看透当初懦弱丑恶的自己。

自责是无用,规划协调好今后的工作和生活。

最近在忙一个网络编程的项目,其实项目从去年七月就开始忙这个项目了,不过当时一直比较消极,效率很低。看了一堆教学视频,结果啥也没记住。

索性尝试写个博客,看能不能把自己零碎的阅读拼起来。

一、网络编程的基本知识

1)OSI 模型

image-20200314120732325

虽然只是应用,但还是需要了解一下底层的模型。

应用发送消息首先是要将数据推给内核系统的协议栈。

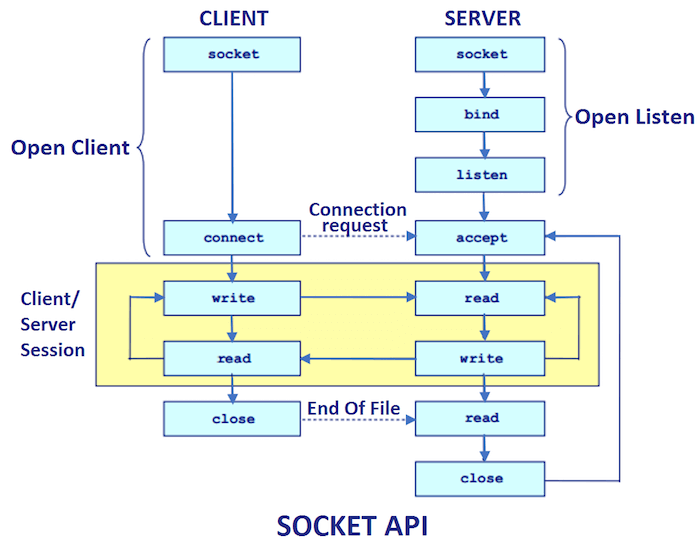
二、套接字模型

Socket Programming in Java

套接字编程是面向连接的,故关心两点:ip地址和端口号。

从上图可以看出,socket编程的工作流程:

  1. 初始化 ServerSocket 将其bind到ip地址和端口号上,接着开启监听listen,最后阻塞到accept上等待client的连接请求。

  2. client 首先初始化 连接 Socket,接着向server端的地址和端口发起 Connection request. 此时执行TCP的三次握手(UDP用的是DatagramSocket 类。)

  3. 连接会话(session)建立,进行一切业务处理操作。

    • client向内核发起write的系统调用执行写操作,发送请求,数据从Application被拷贝到内核协议栈。
    • 协议栈将字节流通过网络设备传输到server端的内核协议栈。
    • server端通过read系统调用, 将协议栈中client 传输的数据, 拷贝到Application,进行解析,并执行业务处理后,以同样的方式写给client 进行响应。

    故,一旦连接建立,数据传输是双向的!

  4. client,server关闭连接。

    • 当client需要和server断开连接时,调用close函数。此时发生的操作是,系统内核向该连接链路上的server发送一个FIN包,server收到后执行被动关闭,
    • 此时client收到server反馈前,认为连接是正常的, 此时整个链路处于半关闭的状态。
    • 当server执行被动关闭时,也会调用close函数,此时整个链路才进入全关闭状态, 双方都会感知到连接已关闭。

webSocket地址格式: 通用地址结构(16字节),IPV4地址结构(16字节),IPV6地址结构(28字节),本地地址结构(最多110字节:本地文件无需端口,路径不同地址可变)。

HTTP,WebSocket的区别和联系:HTTP是应用层协议,基于TCP Socket实现,通常是短连接,客户端只能不断轮询从服务端获得消息。WebSocket是对HTTP的增强,利用TCP双向特性,增强服务端到客户端的传输能力,服务端可以直接推送消息到客户端。

编程实例:

File: MyServer.java

1
2
3
4
5
6
7
8
9
10
11
12
13
14
import java.io.*;  
import java.net.*;
public class MyServer {
public static void main(String[] args){
try{
ServerSocket ss=new ServerSocket(6666);
Socket s=ss.accept();//establishes connection
DataInputStream dis=new DataInputStream(s.getInputStream());
String str=(String)dis.readUTF();
System.out.println("message= "+str);
ss.close();
}catch(Exception e){System.out.println(e);}
}
}

File: MyClient.java

1
2
3
4
5
6
7
8
9
10
11
12
13
14
import java.io.*;  
import java.net.*;
public class MyClient {
public static void main(String[] args) {
try{
Socket s=new Socket("localhost",6666);
DataOutputStream dout=new DataOutputStream(s.getOutputStream());
dout.writeUTF("Hello Server");
dout.flush();
dout.close();
s.close();
}catch(Exception e){System.out.println(e);}
}
}

三、Netty框架

官网:https://netty.io/wiki/user-guide-for-4.x.html

翻译版:http://ifeve.com/netty5-user-guide/

上面有官网,Netty是一款基于NIO(Nonblocking I/O, 非阻塞IO)的网络通信框架。基本原理推荐这篇文章:

彻底理解Netty,这一篇文章就够了

其实本来选择Netty就是为了省些事,因为它封装的功能多。(不过其实真的挺难搞的)

Netty概览:

An Netty overview giving an overview of Netty's internal design

  • Bootstrap类,处理 开始线程,打开sockets等。
  • EventLoopGroup,是一组EventGroup,多个EventGroup组合可以共享一些资源,例如线程等。
  • EventLoop , 保持不断寻找新事件的loop, 例如:来自网络sockets的输入数据,当一个event发生时,继续进行至适当的 event handler, 例如: ChannelHandler

PyTorch 关系抽取

Posted on 2020-02-28 Edited on 2020-03-14

PyTorch 关系抽取

复现论文:Relation Classification via Multi-Level Attention CNNs

源码: https://github.com/SStarLib/myACnn

[TOC]

一、论文简介

简介:

《Relation Classification via Multi-Level Attention CNNs》这篇论文是清华刘知远老师的团队出的一篇文章,这篇文章通过基于两种attention机制的CNN来进行关系抽取任务

motivation:

句子中有些词,对实体关系分类起着重要作用。例如

“Fizzy [drinks] and meat cause heart disease and [diabetes].”

这里面的cause 对实体关系分类就有很重要的作用。通过attention机制学习到句子中比较重要的词

  1. 通过 input-attention 找到句子中对于entity1和entity2中比较重要的部分
  2. 通过 attention-pooling 找到特征图中对于构建relation embedding中重要的部分

二、模型构建

数据预处理

数据预处理应该是比较花时间的一部分。我这里做的也不好。不过很多论文使用这个数据集,可以找到别人已经处理好的数据。

构建模型

需要构建的模块大概分为:

  • 输入表示
  • input attention
  • convolution
  • attention-based pooling
  • 损失函数

1. 输入表示

文本数据向量化

  1. 通过数据集构建vocab, 所谓的vocab 就是一个存储 word-index 的字典。在vocab中需要实现的功能有“增、通过token 查 index, 通过 index查token”, vocab(完整的代码点这里)

    1
    2
    3
    4
    5
    6
    7
    8
    9
    10
    11
    12
    13
    14
    class Vocabulary(object):
    """Class to process text and extract vocabulary for mapping"""
    def __init__(self, token_to_idx=None):
    """
    :param token_to_idx(dict): a pre_existing map of tokens to indices
    """

    if token_to_idx is None:
    token_to_idx = {}
    self._token_to_idx = token_to_idx
    self._idx_to_token = {idx: token
    for token, idx in self._token_to_idx.items()}

    ...........
  2. 将输入的句子 向量化 vectorizer

    将句子中的文本数值化,生成一个索引列表。

  3. 构建数据集生成器 dataset

    该类实现了 torch.utils.data.Dataset 方法,方便使用DataLoader载入数据。

模型的表示层

使用pytorch的自带的embedding函数。本论文中需要构建四个表示层。word embedding, pos1 embedding, pos2 embedding, relation embedding。

  1. 拼接词向量:

    image-20200314145819156

    原论文中公式如上,将连续三个词沿embedding 维度拼接,目的尽可能保留序列信息。实现代码:

    1
    2
    3
    4
    5
    6
    7
    8
    9
    10
    11
    12
    13
    14
    15
    def createWin(self, input_vec):
    """
    [b_s, s_l, e_s+2*pe_s], k=win_size
    :param input_vec: [b_s, s_l, e_s+2*pe_s]
    :return:shape [b_s, s_l, (e_s+2*pe_s)*k]
    """
    n = self.win_size
    result = input_vec
    input_len = input_vec.shape[1]
    for i in range(1,n):
    input_temp = input_vec.narrow(1,i, input_len-i) # 长度应该是 input_len - i
    ten = torch.zeros((input_vec.shape[0],i, input_vec.shape[2]),dtype=torch.float)
    input_temp = torch.cat((input_temp, ten),dim=1)
    result=torch.cat((result,input_temp), dim=2)
    return result
  2. input attention

    这里是第一次的attention,目的是学习出每句话的部分相对于实体的重要性程度

    image-20200314150619108

    image-20200314150632717

    实现代码:

    1
    2
    3
    4
    5
    6
    7
    8
    9
    10
    11
    12
    13
    14
    15
    16
    17
    18
    19
    20
    21
    22
    23
    class Atten_input(nn.Module):
    def __init__(self, config):
    super(Atten_input, self).__init__()
    self.config = config
    def forward(self, entity1, entity2, word, z):
    """
    b_s:batch_size, s_l:length of sentence,e_s:embedding size
    e(n)_l: length of entity n n={1, 2}, pe_s: position embedding size
    :param entity1: [b_s, e1_l, e_s]
    :param entity2: [b_s, e2_l, e_s]
    :param word:shape: [b_s, s_l, e_s]
    :param z: [b_s, s_l, e_s+2*pe_s]
    :return:
    """
    # mean or sum ???
    # 此处出错,应该用 似乎用 w_d 点乘 e
    # 此处出错,mean()会减去一个维度, mean(dim=2)
    A1 = torch.bmm(word, entity1.permute(0,2,1)).mean(dim=2) # [b_s, s_l, 1]
    A2 = torch.bmm(word, entity2.permute(0,2,1)).mean(dim=2) # [b_s, s_l, 1]
    alpha1 = F.softmax(A1, dim=1).unsqueeze(dim=2) # [b_s, s_l, 1]
    alpha2 = F.softmax(A2, dim=1).unsqueeze(dim=2) # [b_s, s_l, 1]
    R = torch.mul(z, (alpha1+alpha2)/2) # [b_s, s_l, e_s+2*pe_s]
    return R
  3. 卷积层

    跟图像卷积的目的一样,学习出local feature map。同时feed 进下一层的attention

    image-20200314151818467

    代码

    1
    2
    3
    4
    5
    6
    7
    8
    9
    10
    11
    12
    13
    14
    15
    16
    17
    18
    19
    class ConvNet(nn.Module):
    def __init__(self, config):
    super(ConvNet, self).__init__()
    self.config =config
    self.in_height = self.config.kernel_size
    self.in_width = \
    (self.config.word_embed_size + 2 * self.config.pos_embed_size)*self.config.win_size
    self.stride = (1, 1)
    self.padding = (1, 0)
    self.kernel_size = (self.in_height,self.in_width)
    self.cnn = nn.Conv2d(1, 1000, self.kernel_size,self.stride,self.padding)
    def forward(self, R):
    """
    d_c =hidden_size= 1000
    :param R: shape: [b_s, s_l, e_s+2*pe_s]
    :return: R_star shape: [b_s,d_c, s_l]
    """
    R_star = torch.tanh(self.cnn(R.unsqueeze(dim=1)).squeeze(-1))
    return R_star
  4. attention pool

    目的是为了在Max pooling 之前 学习 这些local feature map 相对relation 之间的重要性程度,然后使用max pooling。

    image-20200314152402452

    ![image-20200314152613820](/Users/wei/Library/Application Support/typora-user-images/image-20200314152613820.png)

    代码

    1
    2
    3
    4
    5
    6
    7
    8
    9
    10
    11
    12
    13
    14
    15
    16
    17
    18
    19
    20
    21
    class Attn_pool(nn.Module):
    def __init__(self,config):
    super(Attn_pool, self).__init__()
    self.config = config
    self.in_dim = self.config.hidden_size
    self.out_dim = 1
    self.U = nn.Parameter(torch.randn(self.in_dim, self.out_dim))
    self.kernel_size = self.config.max_sen_len
    self.max_pool = nn.MaxPool1d(self.kernel_size, 1)
    def forward(self, R_star, W_L):
    """
    :param R_star: [b_s,d_c, s_l]
    :param W_L: [b_s,1,rel_emb ]
    :return:
    """
    RU = torch.matmul(R_star.permute(0,2,1), self.U) # [b_s, s_l,1]
    G = torch.matmul(RU,W_L) # [b_s, s_l,rel_emb]
    AP = F.softmax(G, dim=1)
    RA = torch.mul(R_star, AP.transpose(2, 1)) #[b_s,d_c, s_l]
    wo = self.max_pool(RA) #[b_s,d_c, 1]
    return wo
  5. loss func

    这篇 paper 里的单独设计了loss 函数,主要使用曼哈顿距离:

    代码

    1
    2
    3
    4
    5
    6
    7
    8
    9
    10
    11
    12
    13
    14
    15
    16
    17
    18
    19
    20
    21
    22
    23
    24
    25
    26
    27
    28
    29
    30
    31
    32
    class DistanceLoss(nn.Module):
    def __init__(self, margin,rel_emb_size, rel_vocab_size,all_y, padding_idx=0):
    super(DistanceLoss, self).__init__()
    self._margin = margin
    self.all_y = torch.from_numpy(np.array(all_y))
    self.relemb = nn.Embedding(embedding_dim=rel_emb_size,
    num_embeddings=rel_vocab_size,
    padding_idx=padding_idx)
    self.relemb.weight.requires_grad=False

    def forward(self, wo, rel_weight, in_y):
    """
    :param wo:[b_s,d_c, 1]
    :param rel_weight:
    :param in_y: [b_s, 1]
    :return:
    """
    self.relemb.weight=nn.Parameter(rel_weight)
    wo_norm = F.normalize(wo.squeeze()) #[b_s,d_c]
    wo_norm_tile = wo_norm.unsqueeze(1).repeat(1, self.all_y.shape[0], 1) # [b_s, num_rel, d_c]
    rel_emb = self.relemb(in_y).squeeze(dim=1) # [b_s, rel_emb]
    all_y_emb = self.relemb(self.all_y) # [b_s, num_rel, rel_emb]
    y_dist=torch.norm(wo_norm - rel_emb, 2, 1) # [b_s, rel_emb]
    # 求最大的错分距离
    # Mask in_y
    all_dist = torch.norm(wo_norm_tile - all_y_emb, 2, 2) # [b_s, num_rel, rel_emb]

    one_hot_y = torch.zeros(in_y.shape[0],self.all_y.shape[0]).scatter_(1, in_y, 1)
    masking_y = torch.mul(one_hot_y, 10000)
    _t_dist = torch.min(torch.add(all_dist, masking_y), 1)[0]
    loss = torch.mean(self._margin + y_dist - _t_dist)
    return loss

    这里的loss 参考了别人的代码,其实代码我也没有完全理解。

三、 训练例程

Pytorch 的训练方式比较套路化。代码:https://github.com/SStarLib/myACnn/blob/master/myMain.py

四、 结尾

可能因为我分割的数据集有问题,效果出奇的好,因为我的测试集是从训练集分出来的,而且shuffle过,很大程度上数据在一个分布上。该任务的原有数据集我还没处理过,不过以后会接着复现该数据集的论文。可以下次一起处理。

另外,有没有人知道mac 下maven 明明已经下载了包,但是idea里还显示报错是什么情况,网上的各种方法都试过了,就是无效。

word2vec 训练embedding的一些理解

Posted on 2020-02-11 Edited on 2020-02-13

以 word2vec 中的CBOW模型为例

CBOW模型原理通过训练上游任务达到训练embedding的效果。

我们可以通过 代码示例, 和 数据流的 shape 的变化把握该模型究竟如何工作的。

==上游任务== 通过句子中的上下文 预测中心词。

首先对数据进行预处理;

1
2
3
4
5
6
7
8
9
10
11
12
13
14
15
16
17
18
19
20
21
22
23
24
25
26
27
#Create windows
# 将向量压平 变成一个一维列表
flatten = lambda outer_list: [item for inner_list in outer_list for item in inner_list]
# 句子结构: windows_size target_word window_size
windows = flatten([list(nltk.ngrams([MASK_TOKEN]*args.window_size + sentence.split(' ') + \
[MASK_TOKEN] * args.window_size, args.window_size * 2 + 1)) \
for sentence in tqdm(cleaned_sentences)])

# Create cbow data
# 将目标词与上下文切分,即 context 与 target
data = []
for window in tqdm(windows):
# 目标词,需要预测的词
# windows_size target_word window_size
target_token = window[args.window_size]
context = []
for i, token in enumerate(window):
if token == MASK_TOKEN or i == args.window_size:
continue
else:
context.append(token)

data.append([' '.join(token for token in context), target_token])


# Convert to dataframe
cbow_data = pd.DataFrame(data, columns=["context", "target"])

以上代码,对句子进行滑动采样。滑动窗size:2*window_size+1 ,然后将采样结果存入 dict 中, 中心词为预测目标,在 dict 中对应target 这个key;左右长度为window_size 的上下文拼接,在dict中对应context这个key。采样结果定长,不足长度用MASK_TOKEN 补齐。数据预处理结束。

模型主要模块

我们要feed进神经网络的输入是 dict 中的context, 用batch_size 记为minibatch的大小。输入x_in的shape为:(batch_size, 2*window_size), 我们将这样一个矩阵输入 embedding 层。embedding 层初始化如下:

1
2
3
self.embedding = nn.Embedding(num_embeddings=vocabulary_size,
embedding_dim=embedding_size,
padding_idx=padding_idx)

这里用 pytorch 中封装好的 torch.nn.Embedding函数来实现。(也可以造轮子,自己实现该模块)

embedding 层的两个重要参数 字典的长度(len(vocab)),记作 vocab_size,和你想要训练的embedding 的size,记作 embed_size。

神经网络在NLP中常见的pipeline

预处理完的数据,不能直接丢进神经网络模型,需要对其数值化。这部分的处理是套路化的几部。在大部分NLP任务几乎都有

  1. 首先 根据原始数据 构建 vocab,该模块的核心是构建一张 word-to-index 的dict。完成 word, index的互查

  2. vectorizer 模块,这部分的核心功能是 完成对 原始数据的 数值化,核心函数 :

    1
    2
    3
    4
    5
    6
    7
    8
    9
    10
    11
    12
    13
    14
    15
    def vectorize(self, context, vector_length=-1):
    """
    :param context(str): the string of words separated by a space
    :param vector_length(int): an argument for forcing the length of index vectors
    :return:
    """
    indices = [self.cbow_vocab.lookup_token(token) for token in context.split(' ')]
    if vector_length < 0:
    vector_length = len(indices)

    out_vector = np.zeros(vector_length, dtype=np.int64)
    out_vector[:len(indices)] = indices
    out_vector[len(indices):] = self.cbow_vocab.mask_index

    return out_vector
  3. dataset 模块,对 pytorch 中 torch.utils.data.DataSet 的继承。对一个封装好的对象的继承,可以很好的完成数据到 torch.tensor的转换,需要人工做的主要部分是在其_getitem_()函数中实现对原始数据的vectorize.

    1
    2
    3
    4
    5
    6
    7
    8
    9
    10
    11
    12
    13
    14
    15
    16
    def __getitem__(self, index):
    """the primary entry point method for PyTorch datasets

    Args:
    index (int): the index to the data point
    Returns:
    a dictionary holding the data point's features (x_data) and label (y_target)
    """
    row = self._target_df.iloc[index]

    context_vector = \
    self._vectorizer.vectorize(row.context, self._max_seq_length)
    target_index = self._vectorizer.cbow_vocab.lookup_token(row.target)

    return {'x_data': context_vector,
    'y_target': target_index}

经过上述数值化处理后的结果可以feed进神经网络模型。这时x_in的size 为(batch_size, 2*window_size), 值为 token对应的index。

然后将x_in feed进embedding层后,生成的结果 shape:(batch_size, 2*window_size, embed_size), 为了训练 需要 去除 dim=1的维度,使用sum函数在dim=1的维度上求和。然后feed进一个线性层。

线性层参数如下:

1
2
self.fc1 = nn.Linear(in_features=embedding_size,
out_features=vocabulary_size)

得到结果 y_out ; shape 为 (batch_size, vocab_size), 然后拿来后 y_target, shape (batch_size),求loss, 误差反向传播,更新优化器,这样 embedding层和线性层都得到训练。

==当然对于这个任务来说,我们关心的是训练好的embedding参数。==

在conda虚拟环境下使用jupyter

Posted on 2019-12-01

第一步:进入conda虚拟环境后, 执行conda install nb_conda, 安装nb_conda

第二步:执行 conda install ipykernel

第三步:执行 conda install -n 环境名称 ipykernel

第四步:将虚拟环境写入 jupyter notebook中的环境中, 执行: python -m ipykernel install –user –name 环境名称 –display-name “jupyter中显示的环境名称”

cs224n naive softmax 的推导与实现

Posted on 2019-09-09

cs224n-naive-softmax-的推导与实现

[TOC]

0、简介

在cs224n(2019)第二次课后作业Assignment 2的手写作业b(推导梯度公式)和编程作业a中对naive softmax的实现。首先手写作业的推导公式,编程作业则是对这些公式的简单实现

1、公式推出

首先看下背景和问题

image-20190909170321836

image-20190909170250701

首先问题a中已经证明了 损失函数 $ J = CrossEntropy(y, \hat{y})$,而且有$\hat{y}=softmax(U^Tv_c)$, 不妨用$\theta=U^tv_c$,现在有$\hat{y}=softmax(\theta)$, 然后用chain rule推导J关于vc的偏导数。

$$ \J=-y\log{\hat{y}};\ \frac{\partial J}{\partial \hat{y}}=-\frac{y}{\hat{y}} \ \hat{y}=softmax(\theta) \ \text{关于softmax的求导如下:} \ \because y=\frac{e^{x_i}}{\Sigma{e^{xj}}} \ \frac{\partial{y}}{\partial{x_i}} = \frac{e^{x_i}(\Sigma-e^{x_i})}{\Sigma^2}=y(1-y) \ \text{由以上softmax的导数可推:} \ \frac{\partial{\hat{y}}}{\partial{\theta}}=\hat{y}(1-\hat{y}) \ \frac{\partial{\theta}}{\partial{v_c}}=U^T \ \text{由链式法则:} \ \because \begin{aligned} \frac{\partial J}{\partial v_c} &= \frac{\partial J}{\partial \hat{y}} \frac{\partial{\hat{y}}}{\partial{\theta}} \frac{\partial \theta}{\partial v_c} =-y\frac{1}{\hat{y}}\hat{y}(1-\hat{y})U^T=-y(1-\hat{y})U^T \ \end{aligned}$$

以上推导完毕。

2、代码实现

大部分代码是作业自带的。

1
2
3
4
5
6
7
8
9
10
11
12
13
14
15
16
17
18
19
20
21
22
23
24
25
26
27
28
29
30
31
32
33
34
35
36
37
38
39
40
41
42
43
44
45
46
def naiveSoftmaxLossAndGradient(
centerWordVec,
outsideWordIdx,
outsideVectors,
dataset
):
""" Naive Softmax loss & gradient function for word2vec models

Implement the naive softmax loss and gradients between a center word's
embedding and an outside word's embedding. This will be the building block
for our word2vec models.

Arguments:
centerWordVec -- numpy ndarray, center word's embedding
(v_c in the pdf handout)
outsideWordIdx -- integer, the index of the outside word
(o of u_o in the pdf handout)
outsideVectors -- outside vectors (rows of matrix) for all words in vocab
(U in the pdf handout)
dataset -- needed for negative sampling, unused here.

Return:
loss -- naive softmax loss
gradCenterVec -- the gradient with respect to the center word vector
(dJ / dv_c in the pdf handout)
gradOutsideVecs -- the gradient with respect to all the outside word vectors
(dJ / dU)
"""

### YOUR CODE HERE

### Please use the provided softmax function (imported earlier in this file)
### This numerically stable implementation helps you avoid issues pertaining
### to integer overflow.
theta=np.dot(centerWordVec, outsideVectors.T)
y_hat = softmax(theta)

loss = -np.log(y_hat)[outsideWordIdx] # J = -log(\hat{y_o})
yhatcopy=y_hat.copy()
temp=yhatcopy[outsideWordIdx]-1 # -y(1-\hat{y})
gradCenterVec=np.dot(temp,outsideVectors)
gradOutsideVecs = np.dot(temp[:, np.newaxis], centerWordVec[np.newaxis,:])

### END YOUR CODE

return loss, gradCenterVec, gradOutsideVecs

Mac hexo gihub 搭建博客所踩的一些坑。

Posted on 2019-07-25

Mac hexo gihub 搭建博客所踩的一些坑。

安装过程参考该链接 :

https://zhuanlan.zhihu.com/p/26625249

一、首先安装 npm之后,在执行

1
npm install -g hexo-cli

时会出现一些权限错误,解决方案如下:

第一步,赋予权限

1
sudo chown -R `whoami` /usr/local/lib/node_modules

然后,按官网执行安装:

1
npm install hexo-cli -g

二、hexo初始化时

在执行如下命令时,同样会出现一些权限错误:

1
hexo init blog

解决方案,输入一下命令:

1
2
sudo chown -R $USER:$GROUP ~/.npm
sudo chown -R $USER:$GROUP ~/.config

参考:

https://zhuanlan.zhihu.com/p/26625249

https://www.itfanr.cc/2017/10/27/problems-for-configuring-hexo-blog-in-mac/

https://stackoverflow.com/questions/50639690/on-npm-install-unhandled-rejection-error-eacces-permission-denied

123

Wei

有志者,事竟成
22 posts
5 tags
© 2020 Wei
Powered by Hexo v3.9.0
|
Theme – NexT.Pisces v7.2.0